If your garbage disposal suddenly stops working, don’t call a plumber yet. Knowing how to unjam a garbage disposal the right way can save you $150 or more on a service call — and in most cases, the fix takes under 10 minutes with tools you already own.
The problem is that most guides online give you the same five generic steps regardless of what’s actually wrong. But a disposal that hums is a completely different problem from one that’s totally silent. A jam caused by a chicken bone needs a different fix than one caused by celery strings. And if you own a Waste King, the most common fix won’t even work on your model.
This guide is built differently. Start with your symptom, follow the right path, and get your disposal running again — without guesswork.
What’s Actually Happening Inside Your Disposal
Before jumping into fixes, it helps to understand what causes a jam in the first place. A garbage disposal doesn’t have traditional blades. It has a spinning metal plate (called a shredding plate or grinding plate) that flings food waste against a stationary grind ring on the inside wall. When something hard, fibrous, or foreign gets wedged between the plate and the ring, the plate locks up. The motor keeps trying to spin, which is why you hear that low humming sound — and if it runs too long in that state, the built-in thermal overload protector trips to prevent the motor from burning out.
That’s the core of almost every jam. The fix depends on what’s causing the lockup and what your disposal is actually doing right now.
Step 1 — Diagnose Your Disposal by Symptom
Don’t skip this section. Starting with the wrong fix wastes time and can make the problem worse.
What is your garbage disposal doing when you flip the switch?
| Symptom | What It Means | Where to Go |
|---|---|---|
| Humming but not spinning | Grinding plate is jammed | Jam Fix Section |
| Completely silent, no sound | Reset button tripped or motor issue | Reset Section |
| Starts then suddenly stops | Thermal overload tripped mid-use | Reset + Cooling Section |
| Grinding noise, won’t drain | Jam combined with drain clog | Jam Fix + Drain Check |
| Allen wrench turns freely but still hums | Object still lodged above the plate | Object Removal Section |
| Burning smell or smoke | Motor may be burned out | Stop — Do Not Continue |
Take 30 seconds to match your symptom before moving on.
How to Unjam a Garbage Disposal — The Core Fix
This is the standard process that works for most jams caused by hard objects like fruit pits, coins, or small bones. Brand-specific variations follow in the next section.
Tools You’ll Need
- Flashlight
- 1/4-inch Allen wrench (hex key) — usually taped under the sink or included with your disposal
- Long-handled tongs or needle-nose pliers
- A broom handle or wooden dowel (backup option)
Step-by-Step Instructions
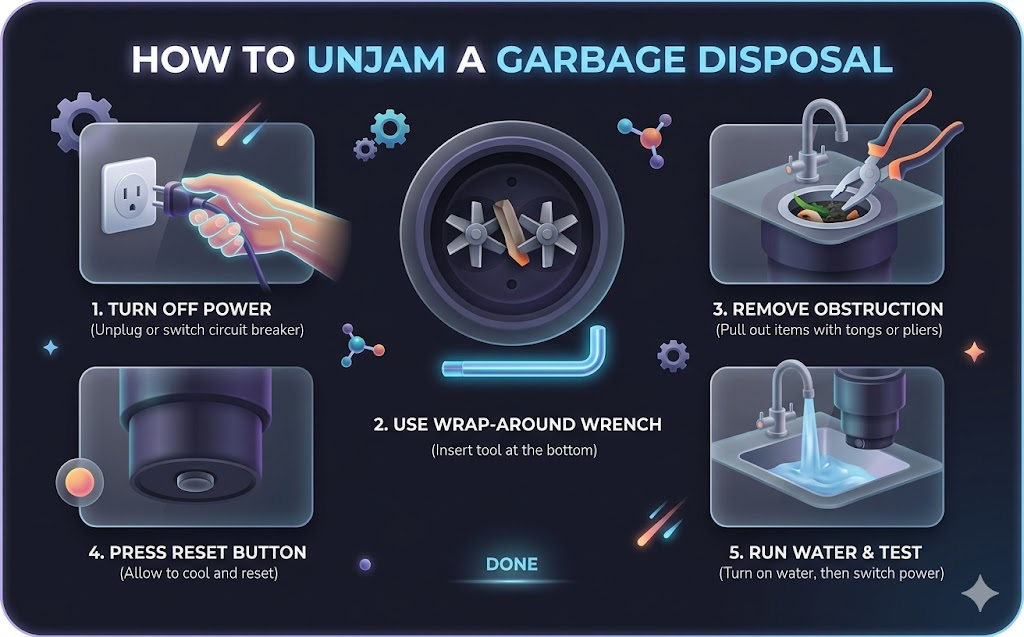
Step 1 — Cut the Power (Non-Negotiable)
Turn off the wall switch, then unplug the disposal from the outlet under the sink. If it’s hardwired, flip the circuit breaker. The wall switch alone is not enough. You are going to be reaching under and potentially into this unit — treat it like it could turn on at any moment.
Step 2 — Look Inside First
Shine a flashlight down into the drain opening. Look at the shredding plate at the bottom and the area around the grind ring along the inner wall. You’re looking for anything that doesn’t belong — a bottle cap, a small bone, a pit, a piece of glass. Do not put your hand inside yet.
Step 3 — Use the Allen Wrench from the Bottom
Get under the sink and locate the hex hole in the very center of the disposal’s base, facing the floor. Insert your 1/4-inch Allen wrench and work it back and forth — not just in one direction. You’re trying to manually rotate the shredding plate to break whatever is wedged against it. Keep working until the plate spins freely through a full 360-degree rotation in both directions.
Step 4 — Remove the Object
Go back to the sink. Use tongs or needle-nose pliers to remove whatever was jamming the plate. Never use your fingers. Even with power off, the grinding mechanism has sharp edges on the grind ring.
Step 5 — Press the Reset Button
On the bottom of the disposal, find the small red button. If the thermal overload tripped during the jam, this button will be popped out about 1/4 inch. Press it firmly until you feel it click. If it won’t stay in, wait 10 minutes for the motor to cool and try again.
Step 6 — Test With Cold Water Running
Plug the unit back in or restore power at the breaker. Turn on a strong flow of cold water first, then flip the disposal switch. Cold water keeps food particles solid and moving through the system — never use hot water while running the disposal, as it melts grease and creates future clogs.
Brand-Specific Instructions
This is the section most guides skip — and it’s why so many people get stuck.
InSinkErator Models (Badger, Evolution, Essential Series)
InSinkErator includes a red-handled “Jam-Buster Wrench” (also called a wrenchette) with every unit. It’s about 4 inches long and shaped like a small crank. If you can’t find it, a standard 1/4-inch Allen wrench works as a substitute.
The hex hole is on the bottom center of the unit. Work the wrenchette in both directions using a cranking motion — InSinkErator specifically designs the wrench to bend slightly before any damage occurs to the disposal, so don’t be afraid to apply reasonable force.
Moen Models
Moen uses a Model 1037 wrenchette with an L-shaped design that gives more leverage in tight under-sink spaces. The process is identical to InSinkErator, but the L-shape allows more torque without repositioning your hand repeatedly. A generic 1/4-inch Allen wrench works fine as a substitute.
Waste King Models (Legend Series, Knight Series)
This is the important one. Waste King disposals do not have a hex hole on the bottom. The standard Allen wrench fix does not apply. Instead:
- Insert a wooden broom handle or sturdy dowel into the drain opening from the top
- Press it against the shredding plate and try to rotate it manually
- Use firm, controlled force — not hard jabbing
- Once the plate moves freely, use tongs to remove the obstruction
Older or Generic Models
Some older disposals have a retaining nut in the center of the grinding plate that’s accessible from the top. You can use the correct-size socket with a long extension to rotate it — but turn clockwise only to avoid loosening the nut further.
When the Allen Wrench Won’t Turn
This is the scenario that sends most people straight to calling a plumber — but there are still several things to try first.
The Jam Is Bigger Than the Wrench Can Handle
If you’re applying real force and the plate won’t budge at all, the obstruction is likely wedged tightly between the plate and grind ring with no give. Try this escalation sequence:
- Remove all visible objects from the top using tongs first
- Return to the Allen wrench and try again — sometimes the top obstruction was adding resistance
- If still stuck, use a larger 3/8-inch Allen wrench and a ratchet for more torque (avoid bending the sink mounting)
- Insert the broom handle from the top simultaneously to apply downward pressure on the plate while turning the Allen wrench from the bottom
The Rust Jam (The Overlooked Cause)
If your disposal hasn’t been used in several weeks or has had a slow drip leak, internal rust may have fused the metal components together. This creates a “soft jam” where the plate feels gritty or stiff on the Allen wrench — not completely locked, but resistant in a grinding, granular way.
Fix:
- Use the Allen wrench to rotate the plate through multiple complete circles to grind away surface rust
- Apply a small amount of food-grade silicone spray through the top opening (avoid any petroleum-based lubricant)
- Run the disposal briefly with cold water once it moves freely
Object-Specific Jam Fixes
Different objects require different extraction approaches. Here’s what actually works:
| Object | Best Removal Method | Common Mistake |
|---|---|---|
| Coin or bottle cap | Magnetic telescoping rod or needle-nose pliers | Trying to shake it loose — it just re-jams |
| Fruit pit (cherry, olive, avocado) | Allen wrench to free it, then tongs to pull out | Running disposal again without removing it first |
| Chicken bone or small bone | Tongs from the top after freeing with Allen wrench | Forcing the motor — it will re-jam immediately |
| Celery or fibrous strings | Needle-nose pliers to pull strings up and out | Hot water flush — it makes strings clump tighter |
| Grease buildup (soft jam) | Cold water + ice cube flush after clearing | Hot water — melts grease into a paste that resets |
| Broken glass | Tongs only — extreme care | Any contact with hands, even with gloves |
The Fibrous Jam Fix in Detail
Celery, corn husks, artichoke leaves, and onion skins are the most common cause of this type of jam, and the standard Allen wrench process alone won’t fully resolve it. how to create mood with light fixtures mrshomint
- Use needle-nose pliers to pull fibrous strings upward and out through the drain opening — they wrap around the plate shaft and won’t flush through
- After pulling out as much material as possible, use the Allen wrench from the bottom to confirm the plate rotates freely
- Run a high volume of cold water for 30 seconds before testing the disposal
- If it re-jams immediately on restart, repeat the string-pulling step — there is almost always more than one bundle
The Reset Button Explained
If your disposal makes no sound at all when you flip the switch, the problem likely isn’t a jam — it’s a tripped thermal overload protector, a dead motor, or a wiring issue.
How to Reset Your Garbage Disposal
- Make sure the wall switch is OFF
- Go under the sink and look at the bottom of the disposal unit
- Find the small square red button (on InSinkErator models) or round button (on some Moen and Waste King models)
- Press it firmly — you should feel and hear a click
- If it immediately pops back out, the motor is still too hot or still jammed — wait 10 minutes and repeat
Reset Button vs. Jam — Know the Difference
- Humming + spinning resistance = jam, use Allen wrench first
- Complete silence = reset button first, then check breaker
- Reset button won’t stay in after cooling = potential motor failure
When to Stop and Call a Plumber
Most jams can be solved with the steps above. But there are specific signs that indicate a deeper problem that DIY cannot safely fix.
- A burning smell or visible smoke from the unit while attempting to unjam it
- The Allen wrench will not move at all even after removing all visible objects and applying significant force
- Water is dripping from the motor housing itself (not from a pipe joint)
- The disposal jams repeatedly within a day or two after each fix
- The motor hums for a second and then goes completely silent without the reset button tripping
At that point, the question becomes whether to repair or replace. A new residential disposal costs $80–$200 depending on brand and horsepower. A plumber’s service call typically runs $150–$300. If the unit is more than 8–10 years old, replacement is almost always the better financial decision.
Prevention — Keep It From Jamming Again
The best jam is the one that never happens. These aren’t just general tips — they’re the specific habits that eliminate the most common causes of disposal jams.
Never put these down the disposal:
- Celery, corn husks, artichoke leaves, asparagus (fibrous — wraps around the plate shaft)
- Potato peels and rice (starchy — creates a paste that coats the grind ring)
- Grease, fat, or cooking oil (solidifies inside the drain line, not the disposal)
- Fruit pits, avocado pits, cherry pits (too hard for residential disposal motors)
- Coffee grounds (accumulate in drain traps and don’t flush through)
- Broken glass, metal, rubber, or any non-food item
Habits that extend disposal life:
- Always run cold water before turning on the disposal, during use, and for 15–20 seconds after
- Feed food in small batches — don’t dump a full plate in at once
- Run the disposal monthly with a cup of ice cubes and a cut lemon to clean the grind ring and control odor
- If you haven’t used it in a week or more, run it with cold water for 30 seconds before adding food
Frequently Asked Questions
Why does my garbage disposal hum but not work?
The motor is running but the grinding plate is locked — something is wedged between the plate and the grind ring. Turn off the power immediately and use a 1/4-inch Allen wrench in the bottom hex hole to manually free it.
What size Allen wrench do I need for a garbage disposal?
Almost all residential disposals use a 1/4-inch hex key. Commercial units and some older models use 3/8-inch. Check your manual or measure the hex hole before buying a replacement.
How do I reset my garbage disposal?
Press the small red (or square) button on the bottom of the unit firmly until it clicks. If it won’t stay in, the motor is still hot — wait 10 minutes and try again.
Can I use hot water to unjam a garbage disposal?
No. Hot water melts grease and fat inside the drain, turning it into a paste that creates future clogs. Always use cold water when running or flushing the disposal.
Why does my disposal keep jamming after I fix it?
Either the original object wasn’t fully removed, or you have a recurring material problem — fibrous foods or grease that keep building up. Check for string material still wrapped around the plate shaft.
My garbage disposal has no hex hole on the bottom — what do I do?
You likely have a Waste King model. Use a wooden broom handle inserted from the top to manually rotate the shredding plate. The process is the same — you’re just applying force from above instead of below.
How long should a garbage disposal last?
Most residential units last 8–12 years with proper maintenance. Frequent jamming on a unit older than 10 years is usually a signal that replacement makes more financial sense than continued repair.
Is it safe to put my hand inside a garbage disposal?
Never, even with the power off. Use long-handled tongs or needle-nose pliers for any object removal. The grind ring has sharp edges regardless of whether the unit is running.
Conclusion
A jammed garbage disposal feels like a crisis in the moment — especially when you have a sink full of water and dinner to clean up. But as this guide shows, it almost never is.
The key is matching your fix to your actual symptom. A humming disposal needs the Allen wrench. A silent one needs the reset button. A Waste King needs a broom handle, not a hex key. Fibrous strings need to be pulled out, not flushed through. Once you understand what’s actually happening inside the unit, the fix becomes straightforward almost every time.
Most people who know how to unjam a garbage disposal solve the problem in under 10 minutes with tools already sitting in a kitchen drawer. That’s $150 or more saved on a plumber call — for a skill you’ll use more than once over the life of the appliance.
So the next time your disposal hums, goes silent, or locks up mid-use, come back to the symptom table at the top of this guide, follow the right path, and you’ll have it running again before the ice in your drink melts.
And if the fix genuinely doesn’t work — if the wrench won’t budge, the motor smells like it’s burning, or the unit keeps re-jamming every other day — that’s useful information too. It means the disposal has reached the end of its life, and replacing it is the smarter call. A new unit installed correctly will outlast another decade of daily kitchen use without the frustration.
